Showing posts with label My Creative Space. Show all posts

Friday, 7 October 2011

My creative space


I can’t take the credit from Mother Nature…she did all the work.  There they were, three new little babies.  Miniatures just like their mum, waiting to be pricked out and given a new tiny home of their own.  


I bow to her greater creativity...


...And yet I somehow feel that I've helped.  I've watered and nurtured the mother plant.  I've shared coffee with her.   I drank the coffee and fed her the grounds.  I pulled off dead leaves and gave her a stick to lean on when she needed it....So in some way I had a small part in the creative process too...


You can see other creative spaces here too...

Wednesday, 20 July 2011

My Creative Space


I’m always burning my oven mitts and however much I wash them they still look dirty. There’s still lots of wear left in them…so I decide to upcycle mine…give them a new coat (a bit like the one I made for the sofa) but this time not only using random fairisle knitting, I also used my new found love of crochet!
this is linked over to our creative space there's some amazing things going on over there, why not check them out...


Thursday, 14 July 2011

My creative Space


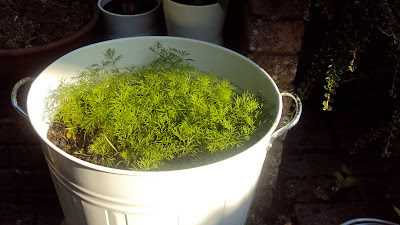
It seemed like a shame to relegate this cute little kitchen bin to be all mashed up and made into something new. It still had so much more life left in it.

So when a friend asked me if I would drop it off at the recycling centre on my way home, I asked if she minded if I recycled it myself.

I filled with homemade compost, Planted dill seeds and it’s made a perfect portable raised bed to grow herbs like this luscious dill to add to my edible garden.


You can check out some more creative spaces here

Wednesday, 6 July 2011

A Creative Use of Space -


My ‘creative space’ recently has been more about a creative 'use' of space and ideas, swapping things around a bit . I upcycled this old wooden cupboard a couple of months ago to hold a piece of artwork for an exhibition. It was part of the installation, with some text projected over it. I painting it in a dark grey matt paint and then papered inside with a patchwork wallpaper samples.

We desperately needed more storage space in our small bathroom so I decided to try out the cupboard. It had been living in the garage with a plinth and lots of other things ever since the exhibition finished. I didn't think it would work, but gave it a go. I'm so happy we did I now have lots more storage space.


He He... I'm now going to do a 'design sponge' type

before


after


...and afterwards I found this Ben and Pepper cupboard on the 'mengsel design blog' and I think it's a little bit similar...except that my paper applique is on the inside instead of outside...


Saturday, 11 June 2011

Natures Bounty - Elder flower cordial

"A tropic heat oozed up from the ground, rank with sharp odours of roots and nettles. Snow-clouds of elder-blossom banked in the sky, showering upon me the fumes and Rakes of their sweet and giddy suffocation. High overhead ran frenzied larks, screaming, as though the sky were tearing apart."

Extract from the opening of Cider with Rosie, Laurie Lee, 1959

Maybe it's because I love reading 'Cider with Rosie,' that I wanted to make Elderflower Cordial with "snow-clouds of elder-blossom".

I just managed to catch the blossoms before they began to fade and die off. Making this was therauputic. If I'd only known how simple, I would have made it ages ago.

To make 3/4 of a litre of Elderflower Cordial you will need:

  • 754ml of water
  • 450g of caster sugar
  • The zest and juice of one unwaxed lemon
  • "A snow-cloud of elder blossom," or 8 elderflower heads will do!
Method:
  1. Carefully tap the flower heads to remove any little insects or dust. You will see from my mini-video below, that this is necessary, even if you think your blossom is insect free! Then place the flower heads into a large bowl.
  2. Put the sugar and water into a saucepan and bring to the boil, stirring all the time until the sugar has dissolved.
  3. Remove the pan from the heat and pour the syrup over the flower heads.
  4. Add the lemon zest and juice. At this point most Elderflower Cordial recipes dictate that you also add Citric Acid. As lemons are full of citric acid, I don't see the necessity. I'm sure that the 'Wainscot Granny', Granny Wallon wouldn't have used any!
  5. Cover the bowl and leave overnight for all the heady perfume of elder-blossom to infuse into the syrup.
  6. Sterilise some bottles. You can do this in the dish-washer if you have one, or wash them thoroughly in hot water and leave to dry in a warm oven.
  7. Strain the cordial and pour into the sterilised bottles. Keep in the fridge until required.

Diluted, the cordial makes a refreshing drink and is a lovely addition to fruit crumbles. I think would make a great cocktail, if I drank them! Apparently it's delicious with gin and tonic...


Just a gentle word of warning. A little tale. When 'A' and I first got married and went through a phase of making wine out of anything possible, including the most delicious sparkling rhubarb champagne; we discovered a massive bank of elderberry trees. They were covered with the most luscious, juicy, dark red berries. We quickly gathered all our friends and spent a happy summer afternoon harvesting enough to make a very large amount of elderberry wine. Spending the remainder of the day planning the happy gatherings that we would have partaking of said wine.

Unfortunately during the gathering we also harvested an inordinate amount of twigs and leaves. A while later, after listening to the reassuringly rythmic plopping of the wine fermenting, we were rewarded with gallons of beautiful looking deep red wine. Well we thought we'd been rewarded, but it had the bitterest taste imaginable... The bitter taste was cyanide which the leaves and branches contain, so must be avoided at all cost. We had to throw it all away...

The moral of this story is just pick the flowers or the berries avoiding the leaves, twigs or bark. Both are really worth harvesting. I plan to make elderberry jam in the autumn, that's if the little tree at the end of our garden produces enough fruit...

you might like to check out what these people are making

Thursday, 12 May 2011

My Creative Space - Beginning Number 2 Sofa Sweater


I've just begun to make another sofa cover like the one here. This time it's for a much bigger sofa and so will take a lot longer to upcycle. Unfortunately I haven't been able to find the lovely big amount of wool I found here for this one. So I've had to order ten massive balls of wool. I hope it will be enough!

Whoops...just noticed I haven't painted inside the shelf!!

ps. You can see what other people are creating here

Sunday, 12 December 2010


My creative space this week has been more than a little influenced by the Narnia like conditions I can see through the window. I wanted to attempt to bring a little of that winter wonderland inside, something quite simple and white....homemade and upcycled. I had lots of thick white paper from Orinoco and started to try out Origami but then I started making snowflakes and I forgot all about the Origami! I made snowflake blinds that look like lacy panels and streamers and hung them from the lights.


Friday, 26 November 2010

My Creative Space


Finishing the tunnel books.